

If you’ve ever browsed the aisles of a craft fair or scrolled through handmade skincare websites, you’ve likely come across the term cold process soap (also known as CP soap). But what is CP soap? Why do artisan soap makers love it so much? And most importantly, why should you consider making or using it?
In this blog, we’ll explore the world of CP soap, how it’s made, its benefits, and why it’s become a favourite among skincare enthusiasts.
Understanding Cold Process Soap
CP soap is a traditional soap-making technique that involves mixing fats or oils with a lye solution (sodium hydroxide and water). This chemical reaction, called saponification, transforms the ingredients into soap and glycerin, resulting in a luxurious, skin-loving product. Unlike hot process soap, which uses heat to speed up saponification, CP soap is created at lower temperatures and requires curing time to fully develop.
This method has been used for centuries and remains popular today because it allows for full creative control over ingredients, design, and fragrance. Many artisan soap makers prefer cold process soap for its ability to produce smooth, long-lasting bars with a rich, creamy lather.
The Science Behind Cold Process Soap
To truly understand what CP soap is, let’s break down the science:
Oils and butters – These are the moisturising and cleansing agents. Popular choices include olive oil, coconut oil, shea butter, and cocoa butter.
Lye (Sodium Hydroxide) – This is the essential alkaline component that reacts with oils to create soap. Without lye, you can’t have real soap!
Water or liquid – This dissolves the lye and helps with saponification. Some soap makers replace water with milk, tea, or fruit juice for added skin benefits.
Fragrance and essential oils – These give the soap its lovely scent. Essential oils like lavender, peppermint, and citrus are popular choices.
Additives and colorants – Natural clays, herbs, exfoliants (like oats or poppy seeds), and mica powders can be added for aesthetic appeal and skin benefits.
Once these ingredients are mixed, the soap must go through a curing period of 4-6 weeks. During this time, excess water evaporates, and the soap hardens into a long-lasting, gentle bar.
Why Choose Cold Process Soap?
Now that we’ve covered the basics of what CP soap is, let’s dive into why it’s so loved by handmade soap makers and skincare enthusiasts alike.
1. Control Over Ingredients
One of the biggest advantages of making CP soap is the ability to choose exactly what goes into your bars. Unlike commercial soaps, which often contain synthetic detergents, preservatives, and harsh chemicals, cold process soap can be made with all-natural ingredients tailored to your skin’s needs.
2. Retains Natural Glycerin
Glycerin is a natural byproduct of the saponification process and is an excellent moisturiser. Many commercial soap manufacturers remove glycerin to use in other skincare products, but in handmade cold process soap, glycerin remains intact, leaving skin feeling soft and hydrated.
3. Longer-Lasting Bars
Because CP soap cures over time, it becomes a hard, long-lasting bar. Unlike melt-and-pour or commercial soaps that dissolve quickly, properly cured cold process soap lasts longer in the shower and provides great value.
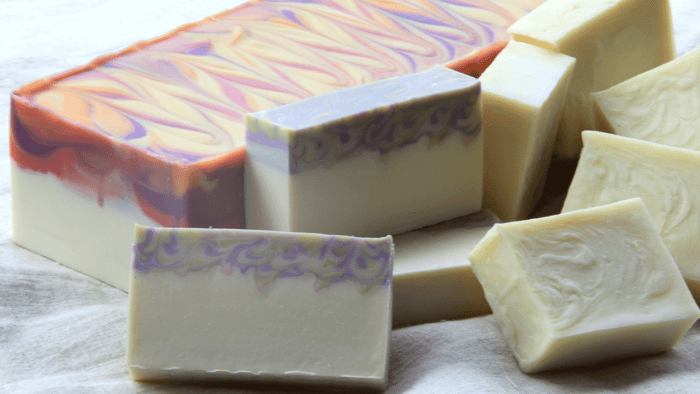
4. Customisation and Creativity
Cold process soap making allows for endless creativity! From swirling vibrant colours to embedding botanicals, soap makers can create unique designs that look like works of art. Plus, you can tailor recipes to include skin-loving oils, exfoliants, or soothing additives like aloe vera or honey.
5. Eco-Friendly and Sustainable
Handmade CP soaps are often more environmentally friendly than mass-produced alternatives. They usually contain biodegradable ingredients, minimal packaging, and no synthetic detergents that harm aquatic life.
How Is Cold Process Soap Made?
If you’re feeling inspired to try making Cp soap, here’s an overview of the basic steps:
Step 1: Gather Ingredients and Tools
You’ll need:
Oils and butters (e.g., olive oil, coconut oil, shea butter)
Lye (sodium hydroxide)
Distilled water or alternative liquid
Essential oils or fragrance oils
Natural colourants and additives
Safety gear (gloves, goggles, apron)
Digital scale, mixing bowls, stick blender, and soap moulds
Step 2: Mix the Lye Solution
Carefully dissolve the lye into water (never the other way around!) in a well-ventilated area. This mixture will get very hot, so allow it to cool to a safe temperature.
Step 3: Blend Oils and Butters
Melt any solid butters, then combine all oils in a large mixing bowl. Ensure both the lye solution and oils are at similar temperatures before proceeding.
Step 4: Combine and Blend
Slowly pour the lye solution into the oils while mixing with a stick blender. Blend until the mixture reaches trace - a pudding-like consistency.
Step 5: Add Fragrance and Extras
Stir in essential oils, natural colorants, and any additional ingredients.
Step 6: Pour and Mould
Pour the soap batter into a mould, tap to remove air bubbles, and smooth the top.
Step 7: Cure the Soap
After 24-48 hours, remove the soap from the mould, cut it into bars, and allow it to cure for 4-6 weeks. This ensures a hard, mild, and long-lasting bar.
Simple CP Soap Recipe (500g Oil Batch)
This recipe creates a balanced, skin-loving bar with a creamy lather.
Ingredients:
Olive Oil – 200g (40%)
Coconut Oil – 150g (30%)
Shea Butter – 75g (15%)
Castor Oil – 25g (5%)
Sweet Almond Oil – 50g (10%)
Sodium Hydroxide (Lye) – 70g (calculated at a 5% superfat)
Distilled Water – 140g
Fragrance Oil – 15g (3% of total oils)
Optional Additives:
Mica or Natural Clay – for colour
Dried Flowers or Botanicals – for decoration
Exfoliants – like oats or poppy seeds
Instructions:
Prepare Your Work Area – Wear gloves, goggles, and long sleeves. Work in a ventilated area.
Mix the Lye Solution – Slowly add sodium hydroxide to distilled water (never the other way around!). Stir and let it cool to about 40-45°C.
Melt the Hard Oils – Gently melt the coconut oil and shea butter, then combine with liquid oils.
Blend Oils & Lye – When both reach 40-45°C, slowly pour the lye solution into the oils while mixing with a stick blender.
Reach Trace – Blend until the mixture thickens to a light trace.
Add Fragrance & Extras – Stir in fragrance oil and any additives.
Pour Into Mould – Tap to remove air bubbles, then smooth the top.
Cure the Soap – Un-mould after 24-48 hours, cut into bars, and cure for 4-6 weeks.
FAQs About Cold Process Soap
Is CP soap better than store-bought soap?Absolutely! Handmade cold process soap contains natural ingredients, retains glycerin, and avoids synthetic detergents found in commercial soaps.
Is lye dangerous? Lye must be handled with care, but when properly mixed and saponified, it becomes harmless. No lye remains in the final bar of soap.
Can I use CP soap immediately after making it? No, cold process soap requires a curing time of at least 4 weeks to allow excess water to evaporate and the soap to harden.
What’s the difference between cold process and hot process soap? Hot process soap is cooked, which speeds up saponification and allows for a shorter curing time. Cold process soap, on the other hand, takes longer to cure but often produces a smoother, more refined bar.
Final Thoughts
So, what is cold process soap? It’s a handcrafted, luxurious, and skin-loving alternative to mass-produced soap. Whether you’re a soap maker looking to explore the craft or a consumer searching for high-quality, natural skincare, cold process soap is an excellent choice. Its ability to be customised with nourishing ingredients, beautiful designs, and eco-friendly properties makes it a true standout in the world of skincare.
Discover Premium Fragrance Oils for Cold Process Soap!
Looking to create your own cold process soap? House of Scent offers premium, undiluted fragrance oils that closely match popular scents. Whether you're crafting for personal use or starting a business, we have the perfect fragrances to bring your cold process soap to life!