
Table of Contents
- Is Cracking a Serious Problem?
- The Science Behind Wax Cracking
- 1. Cooling Too Quickly
- 2. Pouring Temperature Issues
- 3. Type of Wax Used
- 4. Fragrance Oil Interactions
- 5. Uneven Mould Temperature
- 6. Air Bubbles and Pouring Technique
- 7. Overheating the Wax
- 8. Environmental Factors
- Can You Fix Cracked Wax Melts?
- How to Prevent Cracking in Future Batches
- Final Thoughts
- FAQs
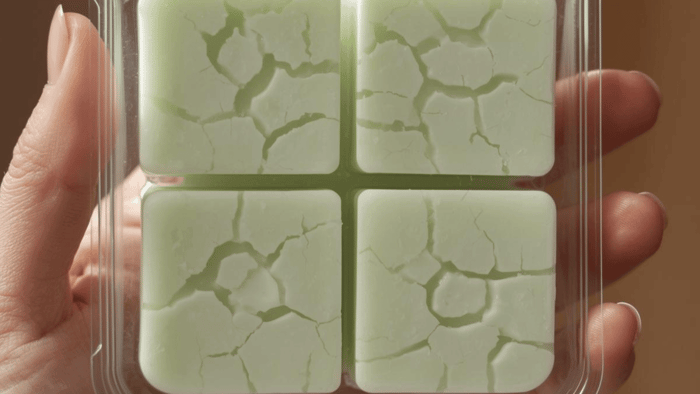
Why Did My Wax Melt Crack After Cooling?
If you’ve ever poured a batch of wax melts, waited patiently for them to set…and then noticed cracks forming on the surface, you’re definitely not alone. One of the most common questions beginners ask is: Why Did My Wax Melt Crack After Cooling?
It can feel frustrating, especially when everything seemed to go right during the process. The good news is that cracking is usually a cosmetic issue - and more importantly, it’s fixable.
In this guide, we’ll break down the real reasons behind cracking, what it means for your wax melts, and how you can prevent it in future batches.
Is Cracking a Serious Problem?
Before diving into Why Did My Wax Melt Crack After Cooling, let’s clear one thing up:
Cracks in wax melts are usually not a safety issue and don’t always affect performance.
However, they can:
Make your melts look less professional
Affect customer perception if you’re selling
Indicate underlying issues in your process
So while it’s not disastrous, it’s definitely worth understanding and improving.
The Science Behind Wax Cracking
To understand Why Did My Wax Melt Crack After Cooling, it helps to know what’s happening as wax solidifies.
When melted wax cools, it contracts. If different parts of the wax cool at different speeds, tension builds up. This uneven contraction can cause visible cracks on the surface or within the melt.
Think of it like drying mud - when it shrinks unevenly, it splits.
1. Cooling Too Quickly
One of the biggest reasons behind Why Did My Wax Melt Crack After Cooling is rapid cooling.
If your wax cools too fast:
The outer layer hardens first
The inside remains warm and continues shrinking
This creates stress, leading to cracks
Common causes of fast cooling:
Pouring in a cold room
Placing melts near a fan or air conditioning
Using cold moulds
How to fix it:
Let melts cool at room temperature (ideally 20–25°C)
Avoid draughts or sudden temperature changes
Pre-warm moulds slightly if needed
Slowing down the cooling process makes a huge difference.
2. Pouring Temperature Issues
Another key factor in Why Did My Wax Melt Crack After Cooling is pouring at the wrong temperature.
If the wax is too hot when poured:
It undergoes more dramatic temperature change
This increases the risk of uneven contraction
If it’s too cool:
The wax may not settle evenly in the mould
Surface tension can lead to cracking or rough tops
Ideal approach:
Follow your wax supplier’s recommended pouring temperature
Typically, this falls between 60–75°C depending on the wax
Consistency is more important than guessing.
3. Type of Wax Used
Not all waxes behave the same way. The type of wax you choose plays a big role in Why Did My Wax Melt Crack After Cooling.
Common wax behaviours:
Soy wax – more prone to imperfections like cracking or frosting
Paraffin wax – smoother finish, less likely to crack
Blended waxes – balanced performance
If you’re using soy wax and noticing cracks, don’t panic—it’s quite common and often purely aesthetic.
Solution:
Experiment with blends or adjust your process before switching wax entirely.
4. Fragrance Oil Interactions
Fragrance oils can affect how wax sets. In some cases, they contribute to Why Did My Wax Melt Crack After Cooling.
Possible issues:
Adding too much fragrance oil
Poor-quality oils that don’t bind well
Mixing inadequately
Tips:
Stay within the recommended fragrance load (usually 6–10%)
Stir thoroughly for at least 1–2 minutes
Use high-quality oils designed for wax products
The better your wax and oil bond, the smoother your final product.
5. Uneven Mould Temperature
Your mould might be playing a bigger role than you think.
Cold moulds can shock the wax when poured, contributing to Why Did My Wax Melt Crack After Cooling.
Fix:
Store moulds at room temperature
Avoid using moulds that feel cold to the touch
Lightly warm moulds using a heat gun or hair dryer if working in a cooler environment
This small adjustment can prevent a lot of surface issues.
6. Air Bubbles and Pouring Technique
Sometimes, cracking isn’t just about cooling - it’s also about how the wax was poured.
Air pockets trapped inside the wax can expand and contract, leading to surface cracks.
Improve your pouring technique:
Pour slowly and steadily
Avoid splashing or aggressive pouring
Tap the mould gently to release trapped air
A smoother pour leads to a smoother finish.
7. Overheating the Wax
Overheating doesn’t just affect scent - it can also impact structure.
If wax is heated too much:
Its internal structure can break down
It may cool unevenly, increasing the risk of cracking
This is another overlooked reason behind Why Did My Wax Melt Crack After Cooling.
Best practice:
Heat wax gradually
Avoid exceeding recommended temperatures
Use a thermometer for accuracy
Precision always pays off in candle and wax melt making.
8. Environmental Factors
Sometimes the issue isn’t your method - it’s your environment.
Factors like room temperature, humidity, and airflow all contribute to Why Did My Wax Melt Crack After Cooling.
Watch out for:
Sudden temperature drops
High humidity
Direct airflow from fans or windows
Ideal conditions:
Stable room temperature
Minimal airflow
Dry environment
Consistency is key when working with wax.
Can You Fix Cracked Wax Melts?
Yes - thankfully, cracks aren’t the end of the world.
Simple fixes:
Re-melt and re-pour – the easiest solution
Heat gun method – gently smooth the surface
Use as testers – perfect for personal use
If you’re selling, it’s best to aim for a clean finish - but for personal use, cracked melts still work perfectly fine.
How to Prevent Cracking in Future Batches
Now that you understand Why Did My Wax Melt Crack After Cooling, here’s a quick checklist to avoid it:
✔ Pour at the correct temperature
✔ Allow wax to cool slowly
✔ Use room-temperature moulds
✔ Measure fragrance oil accurately
✔ Stir thoroughly
✔ Avoid overheating
✔ Control your environment
Even small improvements in these areas can dramatically reduce cracking.
Final Thoughts
If you’ve been asking yourself, Why Did My Wax Melt Crack After Cooling, the answer usually comes down to temperature control, cooling speed, and technique.
The key takeaway?
Cracking is common - especially for beginners - and it doesn’t mean you’re doing everything wrong.
With a few adjustments:
Slower cooling
Better temperature control
Improved pouring technique
…you’ll start seeing smoother, more professional-looking wax melts in no time.
And honestly, every imperfect batch is just part of the learning process. Keep testing, keep refining, and soon enough, those cracks will be a thing of the past. ✨
Disclaimer
The information provided in this blog is for educational and informational purposes only. Wax melt making involves handling hot wax and fragrance oils, which may pose safety risks. Always follow proper safety guidelines, use heat-safe equipment, and work in a well-ventilated area. House of Scent is not responsible for any injuries, damages, or losses resulting from the use of the information provided.
FAQs
Why did my wax melt crack after cooling?
Wax melts usually crack due to uneven cooling, where the outer layer hardens faster than the inside. This creates tension in the wax, leading to surface cracks.
Does cracking affect the performance of wax melts?
In most cases, cracking is only cosmetic and does not affect scent throw or performance. However, it may impact the appearance if you’re selling your products.
How can I prevent wax melts from cracking?
To prevent cracking, pour at the correct temperature, allow the wax to cool slowly at room temperature, use room-temperature moulds, and avoid drafts or sudden temperature changes.