

Table of Contents
Few things are more frustrating than lighting a beautifully scented candle only to notice that it burns unevenly, forming a narrow hole down the centre of the wax while leaving a thick ring around the edges. This phenomenon, known as candle tunnelling, is one of the most common issues faced by candle enthusiasts and makers alike. Naturally, the question arises: Why Does My Candle Tunnel? Understanding the causes and how to fix it can save you both time and money, and ensure your candles burn beautifully from the first light to the last.
In this article, we’ll explore the science behind candle tunnelling, the main reasons it happens, and practical steps to prevent and correct it. Whether you’re a hobbyist, a professional maker, or simply someone who enjoys a good candle at home, this guide will help you get the most out of every burn.
What Is Candle Tunnelling?
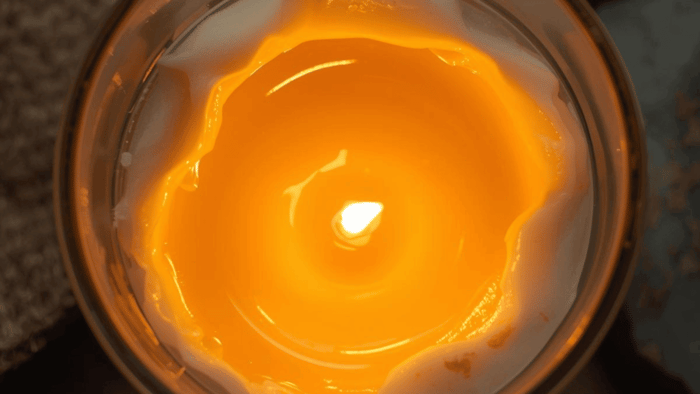
Candle tunnelling occurs when a candle burns down the centre of the wax, leaving a significant portion of the outer wax untouched. If you’ve ever wondered, Why Does My Candle Tunnel, it happens when the flame burns a narrow channel instead of creating a smooth, even pool that reaches the edges of the container. This can waste wax, reduce the fragrance throw, and shorten the life of your candle.
While it’s common, it’s not an inevitable problem. There are several underlying factors that contribute to tunnelling, and addressing them can restore even burning.
Common Causes of Candle Tunnelling
When trying to understand Why Does My Candle Tunnel, it’s helpful to consider the various elements that influence how a candle burns.
1. Wick Size and Type
The wick is the heart of the candle. A wick that is too small for the diameter of the candle won’t generate enough heat to melt the wax all the way to the edges. Conversely, a wick that is too large can produce excessive soot and an overly fast burn. Both extremes affect how the wax melts and may lead to tunnelling.
2. First Burn and Memory Effect
Many candle makers and enthusiasts underestimate the importance of the first burn. The first time a candle is lit, it should be allowed to burn long enough for the wax to reach the edges of the container. This initial melt creates a “memory” for the candle, guiding how it will burn in subsequent uses.
Failing to let the wax pool fully on the first burn is one of the most frequent reasons people ask: Why Does My Candle Tunnel. Even premium candles are not immune if the first burn is too short.
3. Wax Type and Fragrance Load
Not all waxes are created equal. Soy wax, paraffin, coconut, and blends all have different melting points and thermal behaviours. Candles with a high fragrance or essential oil load may also burn cooler, which can prevent the wax from reaching the edges. Both factors contribute to uneven burning and tunnelling.
4. Container Shape and Size
The diameter and shape of the candle container influence how heat is distributed. Narrow, deep containers require a wick that is carefully matched to ensure the wax melts evenly. Wide containers, if paired with a wick that’s too small, are especially prone to tunnelling.
How to Fix Candle Tunnelling
The good news is that most candle tunnelling problems can be corrected with simple techniques. Once you understand Why Does My Candle Tunnel, you can take practical steps to restore an even burn.
1. First Burn Adjustment
If your candle has already started tunnelling, the first step is to correct the initial melt pool. Here’s how:
Light the candle and allow it to burn for an extended period, ideally until the melted wax reaches the edge of the container.
If the wax is very resistant to melting, you can use a heat gun or carefully warm the outer edge with a hairdryer to even out the wax pool.
2. Wrapping Foil Around the Top Edges While Burning
A simple and effective trick for stubbornly tunneled candles is using aluminium foil around the top edges of the container, creating a tent-like dome:
Wrap the Foil: Wrap a piece of aluminium foil around the top edge of the candle jar, forming a dome over the top.
Create an Opening: Leave a 1-to-2-inch opening in the centre of the foil for the flame to breathe and prevent it from being smothered.
Important Safety Tips:
Handle with Care: The aluminium foil will get very hot, so allow it to cool before touching or removing it.
Prevent Fire Hazards: Do not allow the foil to dip into the flame, and never leave a burning candle unattended.
Alternative Methods: If the tunnel is very deep, this method may not work. In such cases, you can use a candle warmer or carefully remove the top layer of wax with a spoon to even out the melt pool.
This method is especially useful for candles that have already developed a deep tunnel and need a quicker fix, and it helps the outer wax melt evenly so the candle burns more efficiently.
3. Trimming the Wick
A wick that is too long can create a high flame and soot, which may exacerbate uneven melting. Before each burn, trim the wick to approximately 0.5–1 cm. This helps the flame burn consistently and prevents excessive tunnelling from developing further.
4. Re-melting the Wax
For severe tunnelling, you can re-melt the wax:
Place the candle in an oven at a low temperature (around 50–60°C) until the top layer of wax becomes liquid.
Rotate the candle as needed to ensure even distribution.
Allow it to cool undisturbed, creating a level surface for future burns.
5. Correct Wick Selection for Future Candles
For makers, understanding Why Does My Candle Tunnel is key to prevention. The best way to avoid it is to match the wick correctly to the container and wax type. Testing multiple wick sizes and types ensures an even burn and reduces the chances of tunnelling from the first use.
Preventing Candle Tunnelling
Prevention is always easier than fixing a problem. Here are some pro tips:
Observe the First Burn: Always allow the wax to pool to the edges the first time the candle is lit. This sets the burn memory.
Avoid Drafts: Air currents can make the flame uneven and encourage tunnelling.
Store Properly: Keep candles at room temperature and avoid extreme cold or heat, which can affect wax consistency.
Consider Wax and Fragrance: High-quality waxes with appropriate fragrance loads burn more evenly.
Trim Wicks Regularly: Keeping wicks at the right height maintains a stable flame.
Why Candle Tunnelling Isn’t Always a Defect
It’s worth noting that a slightly tunneled candle isn’t always a flaw. Some candles, especially those with thicker or wider containers, may naturally tunnel a little due to their design. Understanding Why Does My Candle Tunnel allows you to distinguish between a fixable issue and a natural characteristic.
When to Seek Professional Advice
If you’ve tried the fixes above and your candle still tunnels excessively, there may be a formulation or wick sizing issue. Makers and suppliers should:
Review the wax blend and melting point
Test alternative wick sizes and materials
Check fragrance load compatibility
Conduct controlled burn tests to ensure even heat distribution
Professional guidance can prevent recurring issues, especially for retail or gift-ready candles.
Final Thoughts
Candle tunnelling is a common concern that can be frustrating but is usually fixable. Understanding Why Does My Candle Tunnel involves considering the wick, wax, fragrance, container, and first-burn practices. By following the practical tips above, including the foil method, you can correct existing tunnelling and prevent it in future candles.
Whether you’re lighting a single candle at home or producing a line of hand-poured creations, mastering even burns improves both aesthetic appeal and scent performance. Remember: patience, proper wick selection, careful first burns, and simple tricks like foil wrapping are key to long-lasting, beautifully burning candles.
Once you know why your candle tunnels, it’s much easier to enjoy every burn without wasting wax — ensuring that your home or customers’ homes are filled with fragrance and warmth from start to finish.
Browse Fragrance Oils for Candles
Disclaimer
This blog is published for general informational purposes only. While we provide guidance on why candles may tunnel and tips to fix them, including using aluminium foil, the content does not constitute professional, regulatory, or chemical advice.
Results may vary depending on wax type, wick, fragrance load, container, burn conditions, and individual technique. Readers are responsible for testing all methods safely, following fire safety precautions, and ensuring compliance with applicable UK regulations when making or using candles.
Safety Note: When using foil or other heat-concentrating methods, handle carefully as it can become extremely hot. Never leave a burning candle unattended, and ensure the foil does not come into contact with the flame.
House of Scent cannot accept liability for any loss, damage, or injury resulting from reliance on this content or from the use of candles and related products.
FAQs
Why Does My Candle Tunnel?
Candle tunnelling occurs when the flame burns a narrow channel in the centre of the wax, leaving the outer edges untouched. It’s often caused by wick size, wax type, fragrance load, or an incomplete first burn. Learn more about common candle issues in our Candle Troubleshooting Guide.
How Can I Fix Candle Tunnelling?
You can fix tunnelling by allowing the first burn to reach the edges, trimming the wick, re-melting wax, or using aluminium foil around the container to even out the melt pool. For a step-by-step guide to all candle issues, check out our Candle Troubleshooting Guide.
How Can I Prevent Candle Tunnelling in Future Candles?
Prevention involves using the correct wick size, monitoring the first burn, storing candles away from drafts or extreme temperatures, and trimming wicks regularly.